Difference between revisions of "How to connect FMB640 with FMS Cable"
| (7 intermediate revisions by 2 users not shown) | |||
| Line 1: | Line 1: | ||
== Description == | == Description == | ||
Cable is a '''standardized''' heavy duty vehicle '''FMS 12-pin''' connector, for connecting FMX640 with '''one plug''' and receiving '''vehicle information''' through CAN line and K-line, along with '''powering the device''' and getting '''Ignition detection'''. This ensures easier connection and does not violate the '''factory warranty.''' | Cable is a '''standardized''' heavy duty vehicle '''FMS 12-pin''' connector, for connecting FMX640 with '''one plug''' and receiving '''vehicle information''' through CAN line and K-line, along with '''powering the device''' and getting '''Ignition detection'''. This ensures easier connection and does not violate the '''factory warranty.''' | ||
| − | |||
| − | |||
| − | |||
| − | |||
| − | |||
| − | |||
| − | |||
| − | |||
| − | |||
| − | |||
| − | |||
| − | |||
| − | |||
| − | |||
| − | |||
| − | |||
| − | |||
| − | |||
| − | |||
| − | |||
| − | |||
| − | |||
| − | |||
| − | |||
| − | |||
| − | |||
[[File:Fms-cable-scheme.jpg|center|frameless|852x852px]] | [[File:Fms-cable-scheme.jpg|center|frameless|852x852px]] | ||
| Line 34: | Line 8: | ||
We were able to identify the most common places for the FMS plug – refer to the examples bellow: | We were able to identify the most common places for the FMS plug – refer to the examples bellow: | ||
| − | + | # Behind the Fuse panel on passenger side – for Example SCANIA S/R/G/P Euro6 Series: [[File:Scania R-series 1.3.png|frameless|1000x1000px]] | |
| + | # Near the Fuse panel on passenger side – for example DAF XF Euro6: [[File:DAF XF 1.3.png|frameless|1000x1000px]] | ||
| + | # Behind the Radio on lower deck – for example Volvo FH Euro5 and Renault T Euro6: [[File:Volvo FH 1.3.png|frameless|1000x1000px]] | ||
| + | # Behind the Tachograph on upper deck – for example Mercedes Actros MP5 Euro6: [[File:Mercedes Actros 1.3.png|frameless|1000x1000px]] | ||
| − | |||
| − | ==== | + | ==Device configuration== |
| + | In configurator go to <i>"CAN\ Tachograph"</i> tab and in <i>"Tachograph Settings"</i> select <b>"Front Panel"</b> as <b>"DDD Download Source"</b>: | ||
| + | |||
| + | [[image:Frontgif.gif]] | ||
| − | + | This way DDD files will be downloaded from the tachograph Front Interface. | |
| + | <br> | ||
| + | To read live data, in <i>"Tachograph Data"</i> tab of the configurator, change [https://wiki.teltonika-gps.com/view/FMB640_LVCAN_I/O,FMS_IO_and_Tachograph_data_elements <b>Vehicle Data Priority Settings]</b> -> <b>"K Line Priority"</b> to <b>"Priority 1"</b> | ||
| + | [[image:Vehicle_Data_Priority_Settings_K-line_Priority1.png]] | ||
| + | ==Final Steps== | ||
| − | + | In order to check if the connection/activation/configuration is correct, send "tachocheck" SMS command. If everything is correct, the device will reply: | |
| − | + | •<b>KLN:111,0000, K-Line:0</b> <br> | |
| + | The ones mean the same as in CAN_2:111,.... tachocheck response: <br> | ||
| + | CAN_2:[TRC],[ABCD], K-Line:[K] <br> | ||
| − | + | [T] – Tachograph presence on bus: <br> | |
| − | + | • 0 – Tachograph doesn’t respond on bus; <br> | |
| − | + | • 1 – Tachograph responds on bus. <br> | |
| − | |||
| − | |||
| − | <br> | + | [R] – Response to Open Remote Session validity check: <br> |
| + | • 0 – Wrong or unknown response (failed to open Remote Session); <br> | ||
| + | • 1 – Tachograph responds positively (Remote Session opened successfully). <br> | ||
| + | |||
| + | [C] – Response to Close Last Authentication Session validity check: <br> | ||
| + | • 0 – Wrong or unknown response (failed to close last authentication session); <br> | ||
| + | • 1 – Last authentication session closed successfully, device is ready to open new authentication session. <br> | ||
| − | + | The other values will always be zero because there is no FMS data and the K-line is used for front download. | |
| − | |||
| − | |||
| − | |||
[[Category:FMB640 Manual]] | [[Category:FMB640 Manual]] | ||
Revision as of 13:10, 24 August 2021
Main Page > EOL Products > FMB640 > FMB640 Manual > How to connect FMB640 with FMS CableDescription
Cable is a standardized heavy duty vehicle FMS 12-pin connector, for connecting FMX640 with one plug and receiving vehicle information through CAN line and K-line, along with powering the device and getting Ignition detection. This ensures easier connection and does not violate the factory warranty.

FMS Plug Location
Even though the FMS cable is standardized cable – its placement in the vehicle might differ depending on manufacturer and depending on vehicle trim level.
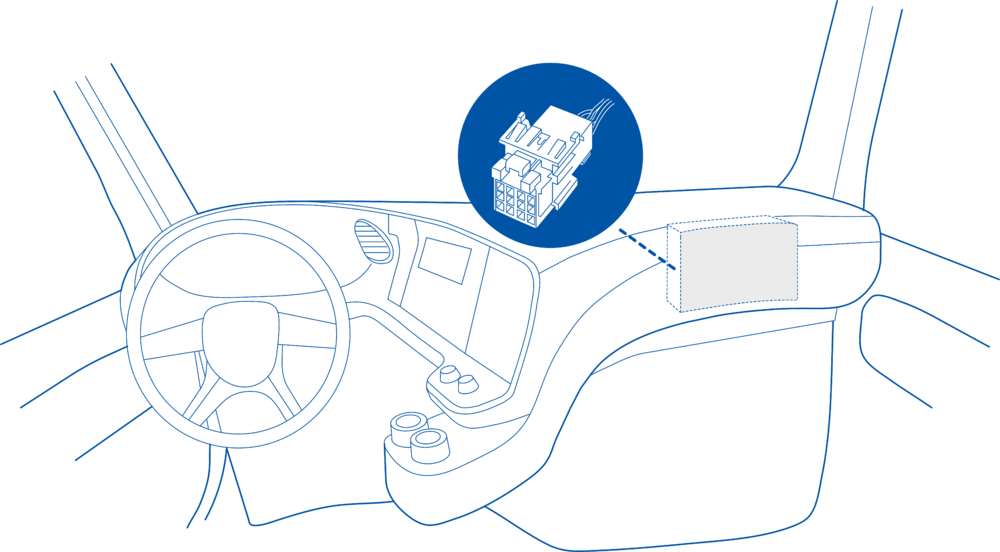
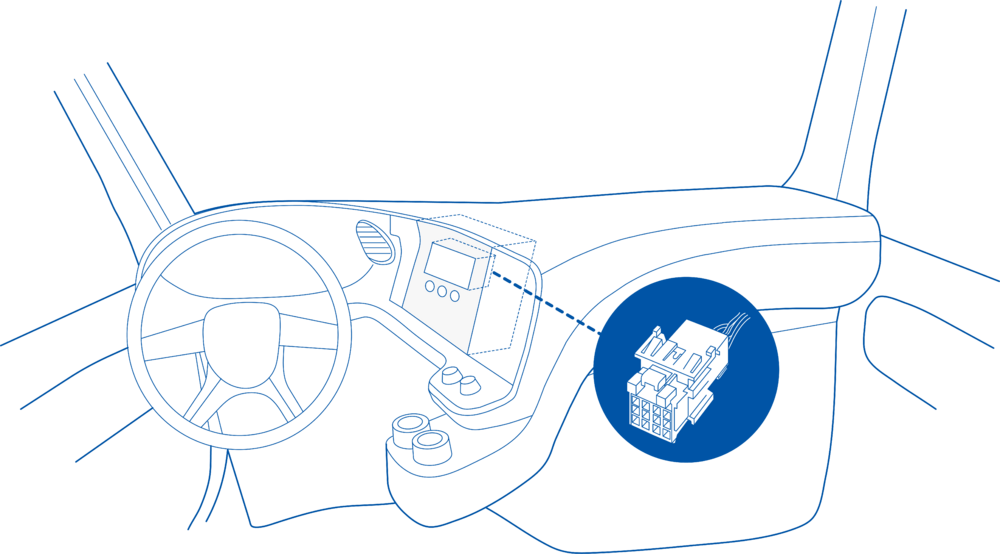
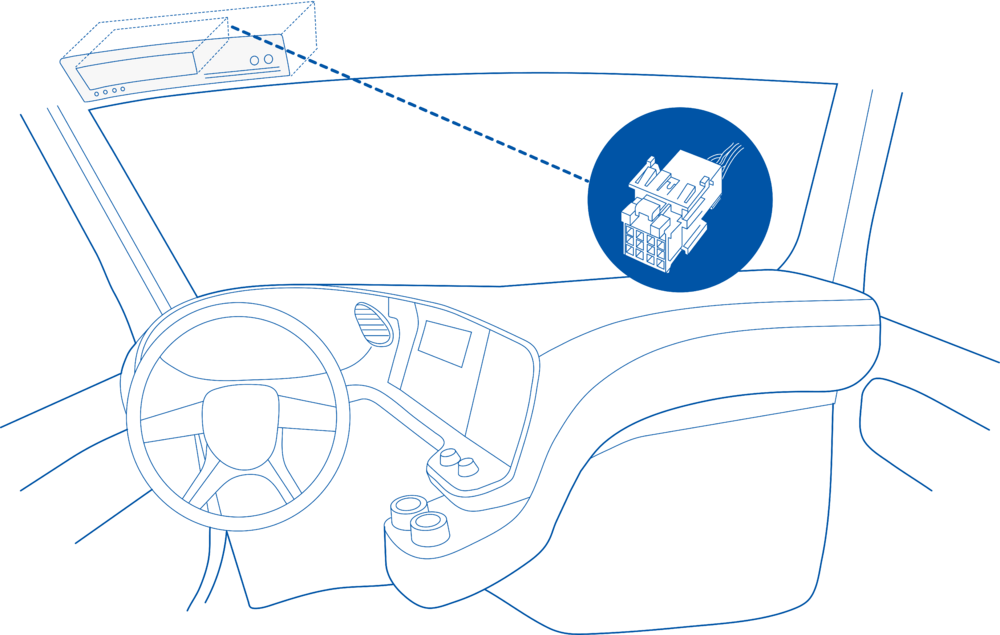
We were able to identify the most common places for the FMS plug – refer to the examples bellow:
- Behind the Fuse panel on passenger side – for Example SCANIA S/R/G/P Euro6 Series:

- Near the Fuse panel on passenger side – for example DAF XF Euro6:
- Behind the Radio on lower deck – for example Volvo FH Euro5 and Renault T Euro6:
- Behind the Tachograph on upper deck – for example Mercedes Actros MP5 Euro6:


Device configuration
In configurator go to "CAN\ Tachograph" tab and in "Tachograph Settings" select "Front Panel" as "DDD Download Source":

This way DDD files will be downloaded from the tachograph Front Interface.
To read live data, in "Tachograph Data" tab of the configurator, change Vehicle Data Priority Settings -> "K Line Priority" to "Priority 1"

Final Steps
In order to check if the connection/activation/configuration is correct, send "tachocheck" SMS command. If everything is correct, the device will reply:
•KLN:111,0000, K-Line:0
The ones mean the same as in CAN_2:111,.... tachocheck response:
CAN_2:[TRC],[ABCD], K-Line:[K]
[T] – Tachograph presence on bus:
• 0 – Tachograph doesn’t respond on bus;
• 1 – Tachograph responds on bus.
[R] – Response to Open Remote Session validity check:
• 0 – Wrong or unknown response (failed to open Remote Session);
• 1 – Tachograph responds positively (Remote Session opened successfully).
[C] – Response to Close Last Authentication Session validity check:
• 0 – Wrong or unknown response (failed to close last authentication session);
• 1 – Last authentication session closed successfully, device is ready to open new authentication session.
The other values will always be zero because there is no FMS data and the K-line is used for front download.

