Difference between revisions of "Iridium Edge"
MindaugasK (talk | contribs) |
|||
| (20 intermediate revisions by 2 users not shown) | |||
| Line 1: | Line 1: | ||
[[File:Irr edge.png|alt=|right|400x400px]] | [[File:Irr edge.png|alt=|right|400x400px]] | ||
| − | + | __TOC__ | |
| − | + | Iridium Edge features an all-in-one SBD module and antenna, with power supply. The plug-and-play satellite IoT terminal can be easily paired with FMB devices in order to expand their functionality to no GSM coverage zones. Current Iridium implementation offers ability to generate and send SBD records after set period after the GSM signal is lost. This ensures constant connectivity for the clients as Iridium network is available globally. | |
| − | |||
| − | |||
| − | |||
| − | |||
| − | == | + | ==First Start== |
| − | |||
| − | + | ===Wiring diagram=== | |
| − | |||
| − | |||
| − | [[File: | + | |
| − | [[Media: Iridium | + | '''FMX125''' device connection to Irridium edge via FMX125 devices. |
| − | < | + | |
| + | [[File:Irridium new.jpg|center|850px]] | ||
| + | |||
| + | '''FMX640''' device connection to Irridium edge via FMX640 devices. | ||
| + | |||
| + | [[File:Iridium connwect.jpeg|center|750px]] | ||
| + | |||
| + | ===Installation=== | ||
| + | |||
| + | '''[[Media:IRDM Iridium Edge Quick Installation Guide.pdf| Iridium Edge Quick Installation Guide]] document''' will show how to install Iridium Edge into the vehicle and prepare the device for configuration with our FMX640 and FMX125 family devices. | ||
| + | |||
| + | '''Please note: it is essential to follow all the instructions for effective installation, if any further questions arise, please contact your sales representative for more information.''' | ||
| + | |||
| + | ===Key Features=== | ||
| + | * Hardware-Ready Device for Simple, Low Risk Integration | ||
| + | * Satellite Add-On for Truly Global Coverage | ||
| + | * Robust Power Supply for Industrial Installations | ||
| + | * Certified in Key Geographic Markets | ||
| + | * 180° Line of Sight for Compromised, Partially Blocked Locations | ||
| + | |||
| + | ===Network characteristics=== | ||
| + | * Frequency: 1616 – 1626.5 MHz | ||
| + | * Message Size: 14 Bytes (Receive), 14 Bytes (Transmit) | ||
| + | * SBD Transceiver: Iridium 9602N | ||
| + | * Antenna: Integrated Iridium® Certified Antenna | ||
| + | |||
| + | ===Environmental characteristics=== | ||
| + | * Operating/Storage Temperature Range: -40C to 85C | ||
| + | * Vibration: SAE J1455, Section 4.10 | ||
| + | |||
| + | ===Mechanical characteristics=== | ||
| + | * Dimensions (LxWxH): 130 x 80 x 30mm | ||
| + | * Ingress Protection: IP 67 | ||
| + | * Side & Bottom Cable Exits | ||
| + | * Connector: M12-8 pin male, terminated on 20cm | ||
| + | * Pigtail Cable | ||
| + | * Installation Options: Pole, Screw, Tape | ||
| + | |||
| + | ===Electrical characteristics=== | ||
| + | * Power Supply: ( 9-32V), SAE J1455 Load Dump Protected | ||
| + | * Maximum Power: 1.6W (Peak for Short Transmit Burst) | ||
| + | * Low Power Modes: < 200uA | ||
| + | * Reverse Polarity Protection | ||
| + | |||
| + | ===Interface characteristics=== | ||
| + | * RS232 AT Command Interface | ||
| + | * On / Off Control Lines | ||
| + | |||
| + | ==Configuration== | ||
| + | |||
| + | ===FMB Firmware implementation on FMC125=== | ||
| + | |||
| + | In order to enable Iridium support on FMB, first it is necessary to enable RS232 support and select “satellite backup” mode. Correct configuration is shown in the picture below. | ||
| + | |||
| + | [[File:Iridium rs232 parameter config.png|center|500x500 px]] | ||
| + | |||
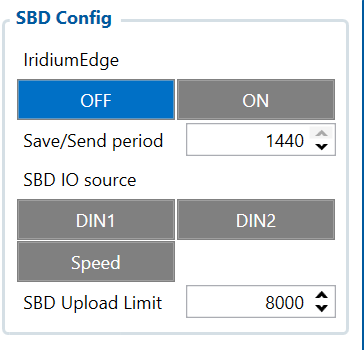
| + | Next, there are a couple of configurable options. In the SBD config, IridiumEdge should be enabled and save/send period Set. This section can be found in the “Features” tab in the configurator. | ||
| + | |||
| + | [[File:Sbd config configurator.png|center]] | ||
| + | |||
| + | ===Setting up Alarm priority records=== | ||
| + | '''NOTE:''' In addition, you can select which IO element can generate Alarm priority record. The configurable IO parameters are listed as SBD IO source in list above. In order to do that you need to configure these IO elements as Panic priority. If properly configured SBD records are generated and sent if there is no GSM connection. | ||
| + | <br></br> | ||
| + | [[File:FMB640 iridium1.png]] | ||
| + | <br></br> | ||
| + | In the scenario shown in the above picture when panic record is made (generated by ''Digital Input 1'' or ''Digital Input 2'') internal 90 seconds timer will start to tick and if in that timeout device will not send the record through GPRS network it will be sent with Iridium satellites. | ||
| + | |||
| + | SBD Upload Limit is configurable and resets every month. This option can ensure that no additional data is used so that no unexpected costs are experienced by the customer. Default value is 8000 (for 8KB plan). This option can be disabled by setting Upload limit to 0. | ||
| + | |||
| + | '''NOTE:''' SBD IO source functionality is still being implemented. | ||
| + | |||
| + | ===FMB Firmware configuration on FMX640/FMX641 devices=== | ||
| + | |||
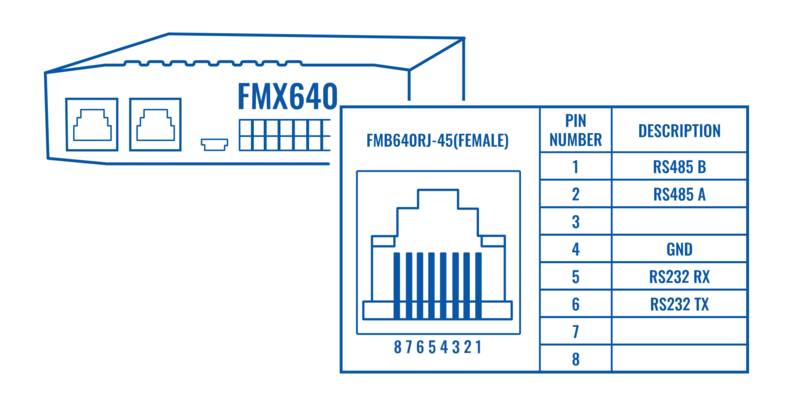
| + | FMX640 can be setup with Iridium Edge by activating RS232 short burst data parameters, this can be done visiting this tutorial [https://wiki.teltonika-gps.com/view/FMB641_Short_Burst_Data Here]. | ||
| + | |||
| + | [[File:FMX640 and RS232 illustration v1.2.png|900x400px]] | ||
| + | |||
| + | [[File:Iridium Edge pinout.png|300px|left]] | ||
| + | {| class="wikitable" style="width:70%;" | ||
| + | |+ | ||
| + | ! colspan="5" style="width:20%; border: 1px solid white; border-bottom: 2px solid #0054A6; background: white; color: #0054A6; text-align: left;"| PIN OUT Configuration | ||
| + | |- | ||
| + | ! style="width:10%; border: 1px solid white; border-bottom: 2px solid #0054A6; background: white; color: #0054A6; text-align: left;"| Pin Number | ||
| + | ! style="width:10%; border: 1px solid white; border-bottom: 2px solid #0054A6; background: white; color: #0054A6; text-align: left;"| Signal Name | ||
| + | ! style="width:10%; border: 1px solid white; border-bottom: 2px solid #0054A6; background: white; color: #0054A6; text-align: left;"| Color | ||
| + | ! style="width:10%; border: 1px solid white; border-bottom: 2px solid #0054A6; background: white; color: #0054A6; text-align: left;"| Signal Direction (With respect to iridium edge) | ||
| + | ! style="width:10%; border: 1px solid white; border-bottom: 2px solid #0054A6; background: white; color: #0054A6; text-align: left;"| Description | ||
| + | |- | ||
| + | | style="border: 1px solid white; border-bottom: 2px solid #E8E8E8; text-align: left; vertical-align: center; background: white;" | 1 | ||
| + | | style="border: 1px solid white; border-bottom: 2px solid #E8E8E8; text-align: left; vertical-align: center; background: white;" | Spare | ||
| + | | style="border: 1px solid white; border-bottom: 2px solid #E8E8E8; text-align: left; vertical-align: center; background: white;" | White | ||
| + | | style="border: 1px solid white; border-bottom: 2px solid #E8E8E8; text-align: left; vertical-align: center; background: white;" | - | ||
| + | | style="border: 1px solid white; border-bottom: 2px solid #E8E8E8; text-align: left; vertical-align: center; background: white;" | Unused | ||
| + | |- | ||
| + | | style="border: 1px solid white; border-bottom: 2px solid #E8E8E8; text-align: left; vertical-align: center; background: white;" | 2 | ||
| + | | style="border: 1px solid white; border-bottom: 2px solid #E8E8E8; text-align: left; vertical-align: center; background: white;" | Ground | ||
| + | | style="border: 1px solid white; border-bottom: 2px solid #E8E8E8; text-align: left; vertical-align: center; background: white;" | Brown | ||
| + | | style="border: 1px solid white; border-bottom: 2px solid #E8E8E8; text-align: left; vertical-align: center; background: white;" | Input | ||
| + | | style="border: 1px solid white; border-bottom: 2px solid #E8E8E8; text-align: left; vertical-align: center; background: white;" | Signal and power GND | ||
| + | |- | ||
| + | | style="border: 1px solid white; border-bottom: 2px solid #E8E8E8; text-align: left; vertical-align: center; background: white;" | 3 | ||
| + | | style="border: 1px solid white; border-bottom: 2px solid #E8E8E8; text-align: left; vertical-align: center; background: white;" | RS232_RX | ||
| + | | style="border: 1px solid white; border-bottom: 2px solid #E8E8E8; text-align: left; vertical-align: center; background: white;" | Green | ||
| + | | style="border: 1px solid white; border-bottom: 2px solid #E8E8E8; text-align: left; vertical-align: center; background: white;" | Input | ||
| + | | style="border: 1px solid white; border-bottom: 2px solid #E8E8E8; text-align: left; vertical-align: center; background: white;" | RS232 input | ||
| + | |- | ||
| + | | style="border: 1px solid white; border-bottom: 2px solid #E8E8E8; text-align: left; vertical-align: center; background: white;" | 4 | ||
| + | | style="border: 1px solid white; border-bottom: 2px solid #E8E8E8; text-align: left; vertical-align: center; background: white;" | RS232_TX | ||
| + | | style="border: 1px solid white; border-bottom: 2px solid #E8E8E8; text-align: left; vertical-align: center; background: white;" | Yellow | ||
| + | | style="border: 1px solid white; border-bottom: 2px solid #E8E8E8; text-align: left; vertical-align: center; background: white;" | Output | ||
| + | | style="border: 1px solid white; border-bottom: 2px solid #E8E8E8; text-align: left; vertical-align: center; background: white;" | RS232 output | ||
| + | |- | ||
| + | | style="border: 1px solid white; border-bottom: 2px solid #E8E8E8; text-align: left; vertical-align: center; background: white;" | 5 | ||
| + | | style="border: 1px solid white; border-bottom: 2px solid #E8E8E8; text-align: left; vertical-align: center; background: white;" | Power | ||
| + | | style="border: 1px solid white; border-bottom: 2px solid #E8E8E8; text-align: left; vertical-align: center; background: white;" | Pink | ||
| + | | style="border: 1px solid white; border-bottom: 2px solid #E8E8E8; text-align: left; vertical-align: center; background: white;" | Input | ||
| + | | style="border: 1px solid white; border-bottom: 2px solid #E8E8E8; text-align: left; vertical-align: center; background: white;" | 9-32 V positive terminal | ||
| + | |- | ||
| + | | style="border: 1px solid white; border-bottom: 2px solid #E8E8E8; text-align: left; vertical-align: center; background: white;" | 6 | ||
| + | | style="border: 1px solid white; border-bottom: 2px solid #E8E8E8; text-align: left; vertical-align: center; background: white;" | ON/OFF | ||
| + | | style="border: 1px solid white; border-bottom: 2px solid #E8E8E8; text-align: left; vertical-align: center; background: white;" | Grey | ||
| + | | style="border: 1px solid white; border-bottom: 2px solid #E8E8E8; text-align: left; vertical-align: center; background: white;" | Input | ||
| + | | style="border: 1px solid white; border-bottom: 2px solid #E8E8E8; text-align: left; vertical-align: center; background: white;" | Optional line to power down Iridium edge | ||
| + | |- | ||
| + | | style="border: 1px solid white; border-bottom: 2px solid #E8E8E8; text-align: left; vertical-align: center; background: white;" | 7 | ||
| + | | style="border: 1px solid white; border-bottom: 2px solid #E8E8E8; text-align: left; vertical-align: center; background: white;" | Network available | ||
| + | | style="border: 1px solid white; border-bottom: 2px solid #E8E8E8; text-align: left; vertical-align: center; background: white;" | Blue | ||
| + | | style="border: 1px solid white; border-bottom: 2px solid #E8E8E8; text-align: left; vertical-align: center; background: white;" | Output | ||
| + | | style="border: 1px solid white; border-bottom: 2px solid #E8E8E8; text-align: left; vertical-align: center; background: white;" | - | ||
| + | |- | ||
| + | | style="border: 1px solid white; border-bottom: 2px solid #E8E8E8; text-align: left; vertical-align: center; background: white;" | 8 | ||
| + | | style="border: 1px solid white; border-bottom: 2px solid #E8E8E8; text-align: left; vertical-align: center; background: white;" | Power detection | ||
| + | | style="border: 1px solid white; border-bottom: 2px solid #E8E8E8; text-align: left; vertical-align: center; background: white;" | Red | ||
| + | | style="border: 1px solid white; border-bottom: 2px solid #E8E8E8; text-align: left; vertical-align: center; background: white;" | Output | ||
| + | | style="border: 1px solid white; border-bottom: 2px solid #E8E8E8; text-align: left; vertical-align: center; background: white;" | Active high when Iridium Edge is powered | ||
| + | |} | ||
| + | |||
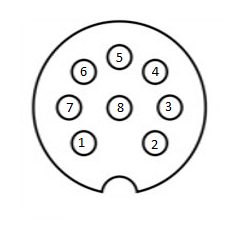
| + | '''Important note:''' There is a noticeable difference in Iridium 8-pin cable layout from the standard version of the cable. We recommend purchasing a specific Iridium-made and certified 8-PIN cable directly from Teltonika. Please contact your administered sales representative to make an order. | ||
| + | |||
| + | ==Communication Protocol== | ||
| + | {| class="wikitable" style="width:50%;" | ||
| + | |+ | ||
| + | ! colspan="7" style="width:50%; border: 1px solid white; border-bottom: 2px solid #0054A6; background: white; color: #0054A6; text-align: left;"| SBD Packet structure | ||
| + | |- | ||
| + | ! style="width:10%; border: 1px solid white; border-bottom: 2px solid #0054A6; background: white; color: #0054A6; text-align: left;"| Timestamp | ||
| + | ! style="width:10%; border: 1px solid white; border-bottom: 2px solid #0054A6; background: white; color: #0054A6; text-align: left;"| Longitude | ||
| + | ! style="width:10%; border: 1px solid white; border-bottom: 2px solid #0054A6; background: white; color: #0054A6; text-align: left;"| Latitude | ||
| + | ! style="width:15%; border: 1px solid white; border-bottom: 2px solid #0054A6; background: white; color: #0054A6; text-align: left;"| SBD AVL ID and flags | ||
| + | ! style="width:10%; border: 1px solid white; border-bottom: 2px solid #0054A6; background: white; color: #0054A6; text-align: left;"| DIN/DOUT info | ||
| + | ! style="width:10%; border: 1px solid white; border-bottom: 2px solid #0054A6; background: white; color: #0054A6; text-align: left;"| Reserved | ||
| + | ! style="width:10%; border: 1px solid white; border-bottom: 2px solid #0054A6; background: white; color: #0054A6; text-align: left;"| Speed | ||
| + | |- | ||
| + | | style="border: 1px solid white; border-bottom: 2px solid #E8E8E8; text-align: left; vertical-align: center; background: white;" | 4 bytes | ||
| + | | style="border: 1px solid white; border-bottom: 2px solid #E8E8E8; text-align: left; vertical-align: center; background: white;" | 3 bytes | ||
| + | | style="border: 1px solid white; border-bottom: 2px solid #E8E8E8; text-align: left; vertical-align: center; background: white;" | 3 bytes | ||
| + | | style="border: 1px solid white; border-bottom: 2px solid #E8E8E8; text-align: left; vertical-align: center; background: white;" | 1 bytes | ||
| + | | style="border: 1px solid white; border-bottom: 2px solid #E8E8E8; text-align: left; vertical-align: center; background: white;" | 1 bytes | ||
| + | | style="border: 1px solid white; border-bottom: 2px solid #E8E8E8; text-align: left; vertical-align: center; background: white;" | 1 bytes | ||
| + | | style="border: 1px solid white; border-bottom: 2px solid #E8E8E8; text-align: left; vertical-align: center; background: white;" | 1 bytes | ||
| + | |} | ||
| + | |||
| + | '''Definitions''' | ||
| + | |||
| + | * Timestamp – Indicates when record was generated | ||
| + | * Longitude - encoded in 3 bytes data. Server which gets this data should divide result from 46603,375 and subtract 180 in order to get actual longitude value. This coefficient is got in following way: 16777215(maximum 3 bytes value) divided from 360 (maximum longitude value then 180 is added). This calculation is used to fit negative and positive values to 3 bytes width variable. | ||
| + | * Latitude - Latitude is calculated in same way as longitude but since latitude maximum value is two times smaller than longitude it can produce a bit more accurate data. Coefficient for latitude is 93206,75. This coefficient is got in following way: 16777215(maximum 3 bytes value) divided from 180 (maximum latitude value then 90 is added). This calculation is used to fit negative and positive values to 3 bytes width variable. | ||
| + | * SBD AVL ID and flags – Custom id that will indicate what caused the record to be generated (as only periodic records are generated, id is not used) | ||
| + | * Din/Dout info - Displays configured IO elements in parameter id 99422 | ||
| + | * Reserved - Not used anywhere, but left due to compatibility with fm6 project. | ||
| + | * Speed – Indicates the speed of the vehicle if configured. If not (or in case of no gps) – will display 255 | ||
| + | |||
| + | ==Data Sending Parameters== | ||
| + | Information here includes the data sending parameters which identifies the naming of the parameter in accordance to it's number. | ||
| + | <br> | ||
| + | {| class="wikitable" | ||
| + | |+ | ||
| + | ! rowspan="1" style="width: 400px; background: #0054A6; color: white;" |'''Parameter ID''' | ||
| + | ! rowspan="1" style="width: 400px; background: #0054A6; color: white;" |'''Parameter name''' | ||
| + | ! rowspan="1" style="width: 400px; background: #0054A6; color: white;" |'''Min values''' | ||
| + | ! rowspan="1" style="width: 400px; background: #0054A6; color: white;" |'''Max values''' | ||
| + | ! rowspan="1" style="width: 400px; background: #0054A6; color: white;" |'''Default values''' | ||
| + | ! rowspan="1" style="width: 400px; background: #0054A6; color: white;" |'''Description''' | ||
| + | |- | ||
| + | | rowspan="1" style="text-align: center; style=" width: 150px; background: white; color: black;" |99420 | ||
| + | | rowspan="1" style="text-align: center; style=" width: 150px; background: white; color: black;" |Iridium Edge | ||
| + | | rowspan="1" style="text-align: center; style=" width: 150px; background: white; color: black;" |0 | ||
| + | | rowspan="1" style="text-align: center; style=" width: 150px; background: white; color: black;" |1 | ||
| + | | rowspan="1" style="text-align: center; style=" width: 150px; background: white; color: black;" |0 | ||
| + | | rowspan="1" style="text-align: center; style=" width: 150px; background: white; color: black;" |This parameter enables or disables Iridium Edge functionality | ||
| + | |- | ||
| + | | rowspan="1" style="text-align: center; style=" width: 150px; background: white; color: black;" |99421 | ||
| + | | rowspan="1" style="text-align: center; style=" width: 150px; background: white; color: black;" |Save/Send period | ||
| + | | rowspan="1" style="text-align: center; style=" width: 150px; background: white; color: black;" |0 | ||
| + | | rowspan="1" style="text-align: center; style=" width: 150px; background: white; color: black;" |1440 | ||
| + | | rowspan="1" style="text-align: center; style=" width: 150px; background: white; color: black;" |1440 | ||
| + | | rowspan="1" style="text-align: center; style=" width: 150px; background: white; color: black;" |This parameter lets to configure Iridium Edge sending period | ||
| + | |- | ||
| + | | rowspan="1" style="text-align: center; style=" width: 150px; background: white; color: black;" |99422 | ||
| + | | rowspan="1" style="text-align: center; style=" width: 150px; background: white; color: black;" |SBD IO source | ||
| + | | rowspan="1" style="text-align: center; style=" width: 150px; background: white; color: black;" |0 | ||
| + | | rowspan="1" style="text-align: center; style=" width: 150px; background: white; color: black;" |6 | ||
| + | | rowspan="1" style="text-align: center; style=" width: 150px; background: white; color: black;" |0 | ||
| + | | rowspan="1" style="text-align: center; style=" width: 150px; background: white; color: black;" |SBD IO elements which when enabled are included into the SBD record | ||
| + | |- | ||
| + | | rowspan="1" style="text-align: center; style=" width: 150px; background: white; color: black;" |151 | ||
| + | | rowspan="1" style="text-align: center; style=" width: 150px; background: white; color: black;" |RS232 Mode | ||
| + | | rowspan="1" style="text-align: center; style=" width: 150px; background: white; color: black;" |0 | ||
| + | | rowspan="1" style="text-align: center; style=" width: 150px; background: white; color: black;" |26 | ||
| + | | rowspan="1" style="text-align: center; style=" width: 150px; background: white; color: black;" |0 | ||
| + | | rowspan="1" style="text-align: center; style=" width: 150px; background: white; color: black;" |Implement ability to select "Sattelite backup" | ||
| + | |- | ||
| + | | rowspan="1" style="text-align: center; style=" width: 150px; background: white; color: black;" |99423 | ||
| + | | rowspan="1" style="text-align: center; style=" width: 150px; background: white; color: black;" |SBD Upload Limit | ||
| + | | rowspan="1" style="text-align: center; style=" width: 150px; background: white; color: black;" |0 | ||
| + | | rowspan="1" style="text-align: center; style=" width: 150px; background: white; color: black;" |30000 | ||
| + | | rowspan="1" style="text-align: center; style=" width: 150px; background: white; color: black;" |8000 | ||
| + | | rowspan="1" style="text-align: center; style=" width: 150px; background: white; color: black;" |Limit to save user from exceeding the monthly plan. Max limit of 30000 due to 30KB plan. If set to 0 – limit will be off. | ||
| + | |} | ||
| + | |||
| + | ==Firmware errata== | ||
| + | |||
| + | |||
| + | ==FAQ - Frequently asked questions regarding Teltonika Iridium Edge solution== | ||
| + | |||
| + | '''Here you will find answers to the most frequently asked questions about Teltonika Iridium Edge. | ||
| + | |||
| + | Please check available questions and answers to them here. If you are not able to find answer then fill the VIP HELP desk query. | ||
| + | {| class="wikitable" | ||
| + | |+ | ||
| + | ! style="background: #0054A6; color: white;" | Question | ||
| + | ! style="background: #0054A6; color: white;" | Comments | ||
| + | |- | ||
| + | |Which Teltonika GPS trackers support Iridium Edge? | ||
| + | |Teltonika FMC125 and FMX64x trackers support Iridium Edge currently. | ||
| + | |- | ||
| + | |With the FMX64 model, can CAN data be sent via Iridium data link? | ||
| + | |CAN data be sent only using GSM link. Using Iridium data link you can send: Location, Speed, Ignition status, Panic button, DIN, DOUT, Crash detection (FMC125). | ||
| + | |- | ||
| + | | Can the data sending work for real-time monitoring? Or should it be scheduled for each x second/minutes reports? | ||
| + | |No, it will start working when the connection is lost. | ||
| + | |- | ||
| + | |Does the device need to have certifications CE/FCC/PTCRB or any local ones? | ||
| + | |Iridium Edge device certificates are to be found at <nowiki>https://www.iridium.com/products/iridium-edge/</nowiki>. Requirements for certification are decided by local governments. | ||
| + | |- | ||
| + | |What use cases do we have? | ||
| + | |The use case is published here - https://teltonika-gps.com/industries/use-cases/logistics-tracking-in-remote-areas-using-iridium-connected-telematics-solution/. The solution is particularly useful for various applications, such as remote mining and construction, international logistics, wildlife tours, and remote team management, so more use cases will follow. | ||
| + | |- | ||
| + | |When working with iridium SBD, can GPS tracking device send data and also receive commands? | ||
| + | |Iridium Edge is only able to send data, one way transmission. | ||
| + | |- | ||
| + | |Does Iridium Connected Telematics Solution have information available at teltonika wiki. | ||
| + | |Yes, there is information available about Iridium Edge at https://wiki.teltonika-gps.com/view/Iridium_Edge. | ||
| + | |- | ||
| + | |Does Iridium Edge have IP67 rating? | ||
| + | |The Iridium Edge has IP67 rating. | ||
| + | |- | ||
| + | |Does Iridium Edge has any power/Status LEDs? | ||
| + | |Iridium Edge does not have power/status LEDS present at the moment. | ||
| + | |- | ||
| + | |Will there be the possibility of parallel operation of GSM and iridium? | ||
| + | |Where there is no GSM connectivity, Iridium Edge will work, and when the vehicle enters the mobile coverage area, Iridium Edge solution will switch to it. If the device loses a GSM connection, it switches to Iridium network. | ||
| + | |- | ||
| + | |How many devices can I connect to one Iridium Edge modem? | ||
| + | |There is possibility to connect only one device. | ||
| + | |- | ||
| + | |Would it be possible to get iridium satellite visibility in underground areas i.e: basement/tunnel/etc? | ||
| + | |It is not possible to get Iridium Edge satellite visibility in undernground areas. | ||
| + | |} | ||
==External links== | ==External links== | ||
| − | https://teltonika-gps.com/lt/product/ | + | https://teltonika-gps.com/lt/product/iridium_edge/ |
[[Category:Accessories]] | [[Category:Accessories]] | ||
Revision as of 10:51, 15 December 2022
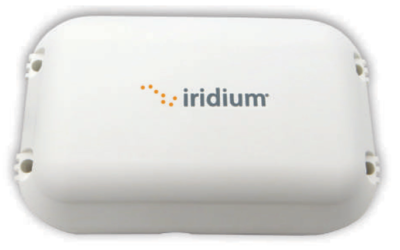
Main Page > Accessories > Iridium EdgeIridium Edge features an all-in-one SBD module and antenna, with power supply. The plug-and-play satellite IoT terminal can be easily paired with FMB devices in order to expand their functionality to no GSM coverage zones. Current Iridium implementation offers ability to generate and send SBD records after set period after the GSM signal is lost. This ensures constant connectivity for the clients as Iridium network is available globally.
First Start
Wiring diagram
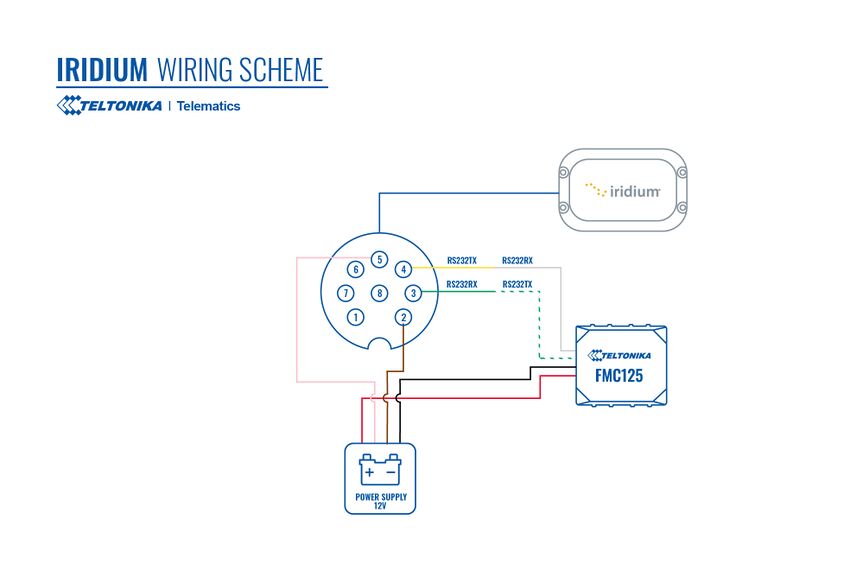
FMX125 device connection to Irridium edge via FMX125 devices.
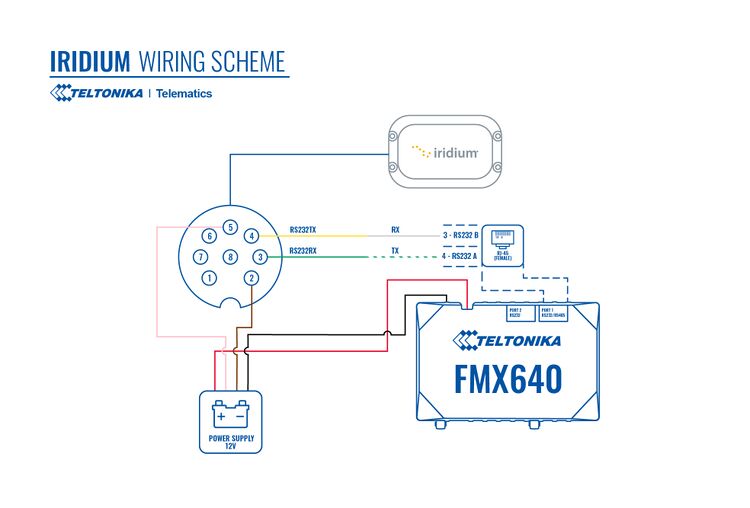
FMX640 device connection to Irridium edge via FMX640 devices.
Installation
Iridium Edge Quick Installation Guide document will show how to install Iridium Edge into the vehicle and prepare the device for configuration with our FMX640 and FMX125 family devices.
Please note: it is essential to follow all the instructions for effective installation, if any further questions arise, please contact your sales representative for more information.
Key Features
- Hardware-Ready Device for Simple, Low Risk Integration
- Satellite Add-On for Truly Global Coverage
- Robust Power Supply for Industrial Installations
- Certified in Key Geographic Markets
- 180° Line of Sight for Compromised, Partially Blocked Locations
Network characteristics
- Frequency: 1616 – 1626.5 MHz
- Message Size: 14 Bytes (Receive), 14 Bytes (Transmit)
- SBD Transceiver: Iridium 9602N
- Antenna: Integrated Iridium® Certified Antenna
Environmental characteristics
- Operating/Storage Temperature Range: -40C to 85C
- Vibration: SAE J1455, Section 4.10
Mechanical characteristics
- Dimensions (LxWxH): 130 x 80 x 30mm
- Ingress Protection: IP 67
- Side & Bottom Cable Exits
- Connector: M12-8 pin male, terminated on 20cm
- Pigtail Cable
- Installation Options: Pole, Screw, Tape
Electrical characteristics
- Power Supply: ( 9-32V), SAE J1455 Load Dump Protected
- Maximum Power: 1.6W (Peak for Short Transmit Burst)
- Low Power Modes: < 200uA
- Reverse Polarity Protection
Interface characteristics
- RS232 AT Command Interface
- On / Off Control Lines
Configuration
FMB Firmware implementation on FMC125
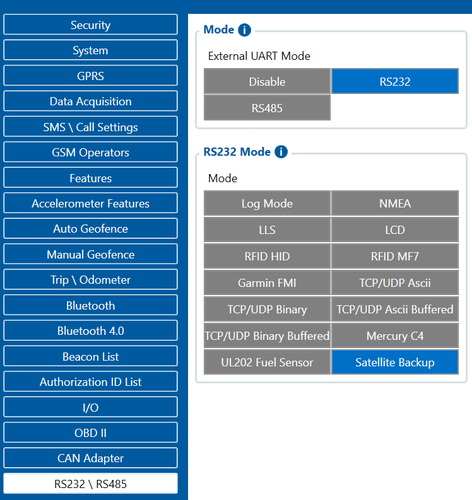
In order to enable Iridium support on FMB, first it is necessary to enable RS232 support and select “satellite backup” mode. Correct configuration is shown in the picture below.
Next, there are a couple of configurable options. In the SBD config, IridiumEdge should be enabled and save/send period Set. This section can be found in the “Features” tab in the configurator.
Setting up Alarm priority records
NOTE: In addition, you can select which IO element can generate Alarm priority record. The configurable IO parameters are listed as SBD IO source in list above. In order to do that you need to configure these IO elements as Panic priority. If properly configured SBD records are generated and sent if there is no GSM connection.

In the scenario shown in the above picture when panic record is made (generated by Digital Input 1 or Digital Input 2) internal 90 seconds timer will start to tick and if in that timeout device will not send the record through GPRS network it will be sent with Iridium satellites.
SBD Upload Limit is configurable and resets every month. This option can ensure that no additional data is used so that no unexpected costs are experienced by the customer. Default value is 8000 (for 8KB plan). This option can be disabled by setting Upload limit to 0.
NOTE: SBD IO source functionality is still being implemented.
FMB Firmware configuration on FMX640/FMX641 devices
FMX640 can be setup with Iridium Edge by activating RS232 short burst data parameters, this can be done visiting this tutorial Here.
| PIN OUT Configuration | ||||
|---|---|---|---|---|
| Pin Number | Signal Name | Color | Signal Direction (With respect to iridium edge) | Description |
| 1 | Spare | White | - | Unused |
| 2 | Ground | Brown | Input | Signal and power GND |
| 3 | RS232_RX | Green | Input | RS232 input |
| 4 | RS232_TX | Yellow | Output | RS232 output |
| 5 | Power | Pink | Input | 9-32 V positive terminal |
| 6 | ON/OFF | Grey | Input | Optional line to power down Iridium edge |
| 7 | Network available | Blue | Output | - |
| 8 | Power detection | Red | Output | Active high when Iridium Edge is powered |
Important note: There is a noticeable difference in Iridium 8-pin cable layout from the standard version of the cable. We recommend purchasing a specific Iridium-made and certified 8-PIN cable directly from Teltonika. Please contact your administered sales representative to make an order.
Communication Protocol
| SBD Packet structure | ||||||
|---|---|---|---|---|---|---|
| Timestamp | Longitude | Latitude | SBD AVL ID and flags | DIN/DOUT info | Reserved | Speed |
| 4 bytes | 3 bytes | 3 bytes | 1 bytes | 1 bytes | 1 bytes | 1 bytes |
Definitions
- Timestamp – Indicates when record was generated
- Longitude - encoded in 3 bytes data. Server which gets this data should divide result from 46603,375 and subtract 180 in order to get actual longitude value. This coefficient is got in following way: 16777215(maximum 3 bytes value) divided from 360 (maximum longitude value then 180 is added). This calculation is used to fit negative and positive values to 3 bytes width variable.
- Latitude - Latitude is calculated in same way as longitude but since latitude maximum value is two times smaller than longitude it can produce a bit more accurate data. Coefficient for latitude is 93206,75. This coefficient is got in following way: 16777215(maximum 3 bytes value) divided from 180 (maximum latitude value then 90 is added). This calculation is used to fit negative and positive values to 3 bytes width variable.
- SBD AVL ID and flags – Custom id that will indicate what caused the record to be generated (as only periodic records are generated, id is not used)
- Din/Dout info - Displays configured IO elements in parameter id 99422
- Reserved - Not used anywhere, but left due to compatibility with fm6 project.
- Speed – Indicates the speed of the vehicle if configured. If not (or in case of no gps) – will display 255
Data Sending Parameters
Information here includes the data sending parameters which identifies the naming of the parameter in accordance to it's number.
| Parameter ID | Parameter name | Min values | Max values | Default values | Description |
|---|---|---|---|---|---|
| 99420 | Iridium Edge | 0 | 1 | 0 | This parameter enables or disables Iridium Edge functionality |
| 99421 | Save/Send period | 0 | 1440 | 1440 | This parameter lets to configure Iridium Edge sending period |
| 99422 | SBD IO source | 0 | 6 | 0 | SBD IO elements which when enabled are included into the SBD record |
| 151 | RS232 Mode | 0 | 26 | 0 | Implement ability to select "Sattelite backup" |
| 99423 | SBD Upload Limit | 0 | 30000 | 8000 | Limit to save user from exceeding the monthly plan. Max limit of 30000 due to 30KB plan. If set to 0 – limit will be off. |
Firmware errata
FAQ - Frequently asked questions regarding Teltonika Iridium Edge solution
Here you will find answers to the most frequently asked questions about Teltonika Iridium Edge.
Please check available questions and answers to them here. If you are not able to find answer then fill the VIP HELP desk query.
| Question | Comments |
|---|---|
| Which Teltonika GPS trackers support Iridium Edge? | Teltonika FMC125 and FMX64x trackers support Iridium Edge currently. |
| With the FMX64 model, can CAN data be sent via Iridium data link? | CAN data be sent only using GSM link. Using Iridium data link you can send: Location, Speed, Ignition status, Panic button, DIN, DOUT, Crash detection (FMC125). |
| Can the data sending work for real-time monitoring? Or should it be scheduled for each x second/minutes reports? | No, it will start working when the connection is lost. |
| Does the device need to have certifications CE/FCC/PTCRB or any local ones? | Iridium Edge device certificates are to be found at https://www.iridium.com/products/iridium-edge/. Requirements for certification are decided by local governments. |
| What use cases do we have? | The use case is published here - https://teltonika-gps.com/industries/use-cases/logistics-tracking-in-remote-areas-using-iridium-connected-telematics-solution/. The solution is particularly useful for various applications, such as remote mining and construction, international logistics, wildlife tours, and remote team management, so more use cases will follow. |
| When working with iridium SBD, can GPS tracking device send data and also receive commands? | Iridium Edge is only able to send data, one way transmission. |
| Does Iridium Connected Telematics Solution have information available at teltonika wiki. | Yes, there is information available about Iridium Edge at https://wiki.teltonika-gps.com/view/Iridium_Edge. |
| Does Iridium Edge have IP67 rating? | The Iridium Edge has IP67 rating. |
| Does Iridium Edge has any power/Status LEDs? | Iridium Edge does not have power/status LEDS present at the moment. |
| Will there be the possibility of parallel operation of GSM and iridium? | Where there is no GSM connectivity, Iridium Edge will work, and when the vehicle enters the mobile coverage area, Iridium Edge solution will switch to it. If the device loses a GSM connection, it switches to Iridium network. |
| How many devices can I connect to one Iridium Edge modem? | There is possibility to connect only one device. |
| Would it be possible to get iridium satellite visibility in underground areas i.e: basement/tunnel/etc? | It is not possible to get Iridium Edge satellite visibility in undernground areas. |
