Difference between revisions of "First time with flespi platform"
m |
(Created page with "==Introduction== 300px|frame Many clients who own a Teltonika device ask how to create a server to send data to. To get you a quick start, we present you...") |
||
| (2 intermediate revisions by the same user not shown) | |||
| Line 1: | Line 1: | ||
==Introduction== | ==Introduction== | ||
[[Image:Flespi.png|300px|frame]] | [[Image:Flespi.png|300px|frame]] | ||
| − | Many clients who own a Teltonika device ask how to create a server to send data to. To get you a quick start, we present you a tutorial with the most important steps that have to be taken, when setting up your device to send data to the server – flespi platform!<br> | + | Many clients who own a Teltonika device ask how to create a server to send data to. To get you a quick start, we present you a tutorial with the most important steps that have to be taken, when setting up your device to send data to the server – flespi platform! |
| − | + | <br><br><br><br><br><br> | |
| − | |||
==First time with flespi== | ==First time with flespi== | ||
| − | <b>1.</b> Go to [https://flespi.io/ flespi.io]<br><b>2.</b> Click on <b>Login/Register</b> button<br><b>3.</b> Click on one of the icons to register with<br> | + | <b>1.</b> Go to [https://flespi.io/ flespi.io]<br> |
| + | <b>2.</b> Click on <b>Login/Register</b> button<br> | ||
| + | <b>3.</b> Click on one of the icons to register with<br> | ||
<i>In the example, registering is done as shown in the picture:</i> | <i>In the example, registering is done as shown in the picture:</i> | ||
| Line 27: | Line 28: | ||
==How to add a device== | ==How to add a device== | ||
| − | <b>1.</b> Click on <b>Telematics Hub</b> to expand the panel<br><b>2.</b> Click <b>Devices tab</b><br><b>3.</b> To add a device, click '<b>+</b>' button, which is at the bottom right corner of the screen<br><b>4.</b> After '<b>+</b>' clicking button, a Device tab appears in which you have to fill the fields<br> | + | <b>1.</b> Click on <b>Telematics Hub</b> to expand the panel<br> |
| + | <b>2.</b> Click <b>Devices tab</b><br> | ||
| + | <b>3.</b> To add a device, click '<b>+</b>' button, which is at the bottom right corner of the screen<br> | ||
| + | <b>4.</b> After '<b>+</b>' clicking button, a Device tab appears in which you have to fill the fields<br> | ||
[[Image:Device_add.png|1000px|frame|center]]<br> | [[Image:Device_add.png|1000px|frame|center]]<br> | ||
| Line 37: | Line 41: | ||
==How to create a channel== | ==How to create a channel== | ||
| − | <b>1.</b> Click on <b>Telematics Hub</b> to expand the panel<br><b>2.</b> Click <b>Channels tab</b><br><b>3.</b> To add a channel, click '<b>+</b>' button, which is at the bottom right corner of the screen<br><b>4.</b> After '<b>+</b>' clicking button, a Channel tab appears in which you have to fill the following fields<br> | + | <b>1.</b> Click on <b>Telematics Hub</b> to expand the panel<br> |
| + | <b>2.</b> Click <b>Channels tab</b><br> | ||
| + | <b>3.</b> To add a channel, click '<b>+</b>' button, which is at the bottom right corner of the screen<br> | ||
| + | <b>4.</b> After '<b>+</b>' clicking button, a Channel tab appears in which you have to fill the following fields<br> | ||
[[Image:Example_Channel_add.png|1000px|frame|center]]<br> | [[Image:Example_Channel_add.png|1000px|frame|center]]<br> | ||
| − | <b>5.</b> Once the saving is done, a channel is created. In example below, a channel named TELTONIKA_TEST is created<br><br> | + | <b>5.</b> Once the saving is done, a channel is created. In example below, a channel named TELTONIKA_TEST is created<br> |
| + | <br> | ||
[[Image:Channel_domain-port.png|1000px|frame|center]]<br> | [[Image:Channel_domain-port.png|1000px|frame|center]]<br> | ||
==How to connect a device to created channel== | ==How to connect a device to created channel== | ||
In instructions [[First_time_with_flespi_platform#How_to_create_a_Channel| <i>'How to create a channel'</i>]] a channel has been created with channel <b>IP Address/Domain and Port</b> numbers. To connect to that | In instructions [[First_time_with_flespi_platform#How_to_create_a_Channel| <i>'How to create a channel'</i>]] a channel has been created with channel <b>IP Address/Domain and Port</b> numbers. To connect to that | ||
| − | channel, the device must be configured. <b>IP Address/Domain and Port</b> numbers are shown in image below.<br><br> | + | channel, the device must be configured. <b>IP Address/Domain and Port</b> numbers are shown in image below.<br> |
| + | <br> | ||
[[Image:Channel_domain-port.png|1000px|frame|center]]<br> | [[Image:Channel_domain-port.png|1000px|frame|center]]<br> | ||
| Line 54: | Line 63: | ||
<b>1.</b> Press <b>GPRS</b> tab<br> | <b>1.</b> Press <b>GPRS</b> tab<br> | ||
* <b>''GPRS Context'' field requires you to enter your SIM providers' APN settings. Make sure to fill this in based on the SIM provider you are using with your Teltonika device.</b> | * <b>''GPRS Context'' field requires you to enter your SIM providers' APN settings. Make sure to fill this in based on the SIM provider you are using with your Teltonika device.</b> | ||
| − | More information about ''GPRS'' panel and it's parameters for each device can be found | + | More information about ''GPRS'' panel and it's parameters for each device can be found here: |
| − | [[TST100 GPRS settings|TST100]] | [[TFT100 GPRS settings|TFT100]] | [[GH5200 GPRS settings|GH5200]] | [[TMT250 GPRS settings|TMT250 | + | [[TST100 GPRS settings|TST100]] | [[TFT100 GPRS settings|TFT100]] | [[GH5200 GPRS settings|GH5200]] | [[TMT250 GPRS settings|TMT250]] |
|} | |} | ||
| Line 72: | Line 81: | ||
* <i>Send Period</i> – Send records to the server every 30 seconds.<br> | * <i>Send Period</i> – Send records to the server every 30 seconds.<br> | ||
| − | More information about ''Data acquisition'' panel for each device can be found | + | More information about ''Data acquisition'' panel for each device can be found here: |
| − | [[TST100_Data_acquisition_settings|TST100]] | [[TFT100_Data_acquisition_settings|TFT100]] | [[GH5200_Data_acquisition_settings|GH5200]] | [[TMT250_Data_acquisition_settings|TMT250 | + | [[TST100_Data_acquisition_settings|TST100]] | [[TFT100_Data_acquisition_settings|TFT100]] | [[GH5200_Data_acquisition_settings|GH5200]] | [[TMT250_Data_acquisition_settings|TMT250]] |
| + | |||
| + | <br> | ||
[[Image:Data_acquisition_flespi.png|1000px|frame|center]]<br> | [[Image:Data_acquisition_flespi.png|1000px|frame|center]]<br> | ||
| Line 88: | Line 99: | ||
<div style="text-align: center;"><b>We recommend to use the latest version of the firmware. Contact your sales manager to get Teltonika Drive link and download the latest version.</b></div><br> | <div style="text-align: center;"><b>We recommend to use the latest version of the firmware. Contact your sales manager to get Teltonika Drive link and download the latest version.</b></div><br> | ||
| − | <b>1.</b> Go to [https://flespi.io/ flespi.io] platform<br><b>2.</b> Login and select <b>Channels</b> panel<br><b>3.</b> Tap on a <b>channel</b><br><b>4.</b> When selected, a channel window appears. Click on <b>TOOLBOX</b></b><br><b>5.</b> When <b>TOOLBOX</b></b> is opened, a new screen appears, where records from the device sent to the channel can be seen<br><b>6.</b> Click on icon, which is at the bottom right side as shown in the picture below<br> | + | <b>1.</b> Go to [https://flespi.io/ flespi.io] platform<br> |
| − | + | <b>2.</b> Login and select <b>Channels</b> panel<br> | |
| − | + | <b>3.</b> Tap on a <b>channel</b><br> | |
| + | <b>4.</b> When selected, a channel window appears. Click on <b>TOOLBOX</b></b><br> | ||
| + | <b>5.</b> When <b>TOOLBOX</b></b> is opened, a new screen appears, where records from the device sent to the channel can be seen<br> | ||
| + | <b>6.</b> Click on icon, which is at the bottom right side as shown in the picture below<br> | ||
| + | [[Image:Server_icons.png|1000px|frame|center]]<br> | ||
<b>7.</b> In the search field, search for these parameters:<br> | <b>7.</b> In the search field, search for these parameters:<br> | ||
| Line 101: | Line 116: | ||
<b>8.</b> If everything is done correctly, at the bottom, three new recently added columns are visible<br> | <b>8.</b> If everything is done correctly, at the bottom, three new recently added columns are visible<br> | ||
| − | [[Image:New_columns_flespi.png|1000px|frame|center]] | + | [[Image:New_columns_flespi.png|1000px|frame|center]]<br> |
| − | |||
<b>9.</b> Now unplug the devices and test proximity feature. When proximity event happens, the device sends data to the flespi platform.<br> | <b>9.</b> Now unplug the devices and test proximity feature. When proximity event happens, the device sends data to the flespi platform.<br> | ||
| − | [[Image:Proximity_flespi_violation.png|1000px|frame|center]] | + | [[Image:Proximity_flespi_violation.png|1000px|frame|center]]<br> |
<div style="text-align: center;"><b>Information about parameters:</b></div> | <div style="text-align: center;"><b>Information about parameters:</b></div> | ||
| Line 126: | Line 140: | ||
* <b>To find out about ManDown feature visit:</b> [[GH5200_Features_settings#ManDown|GH5200]] | [[TMT250_Features_settings#ManDown|TMT250]] | * <b>To find out about ManDown feature visit:</b> [[GH5200_Features_settings#ManDown|GH5200]] | [[TMT250_Features_settings#ManDown|TMT250]] | ||
* <b>To learn how to configure a ManDown feature visit:</b> [[How_to_configure_ManDown_scenario|ManDown scenario]]<br> | * <b>To learn how to configure a ManDown feature visit:</b> [[How_to_configure_ManDown_scenario|ManDown scenario]]<br> | ||
| − | <b>1.</b> Go to [https://flespi.io/ flespi.io] platform<br><b>2.</b> Login and select <b>Channels</b> panel<br><b>3.</b> Tap on a <b>channel</b><br><b>4.</b> When selected, a channel window appears. Click on <b>TOOLBOX</b></b><br><b>5.</b> When <b>TOOLBOX</b></b> is opened, a new screen appears, where records from the device sent to the channel can be seen<br><b>6.</b> Click on icon, which is at the bottom right side as shown in the picture below<br> | + | <b>1.</b> Go to [https://flespi.io/ flespi.io] platform<br> |
| − | + | <b>2.</b> Login and select <b>Channels</b> panel<br> | |
| − | + | <b>3.</b> Tap on a <b>channel</b><br> | |
| − | + | <b>4.</b> When selected, a channel window appears. Click on <b>TOOLBOX</b></b><br> | |
| + | <b>5.</b> When <b>TOOLBOX</b></b> is opened, a new screen appears, where records from the device sent to the channel can be seen<br> | ||
| + | <b>6.</b> Click on icon, which is at the bottom right side as shown in the picture below<br> | ||
| − | + | [[Image:Server_icons.png|1000px|frame|center]]<br> | |
| − | + | <b>7.</b> In the search field, search for <b>mandown.alarm.status</b> parameter<br> | |
| + | <b>Click on the eye button to add a column</b><br> | ||
| + | <b>8.</b> If everything is done correctly, at the bottom, a new recently added column is visible: <b>mandown.alarm.status</b> | ||
| + | [[Image:ManDown_flespi.png|1000px|frame|center]]<br> | ||
| − | <b>9.</b> When a ManDown event happens, the device sends a record to flespi platform<br> | + | <b>9.</b> When a ManDown event happens, the device sends a record to flespi platform</b><br> |
[[Image:Mandown_flespi_true.png|1000px|frame|center]]<br> | [[Image:Mandown_flespi_true.png|1000px|frame|center]]<br> | ||
| Line 147: | Line 166: | ||
<b>To learn how to configure in door tracking using BLE advertising Beacons visit:</b> [[How to read data from BLE Beacons]] | <b>To learn how to configure in door tracking using BLE advertising Beacons visit:</b> [[How to read data from BLE Beacons]] | ||
| − | <b>1.</b> Go to [https://flespi.io/ flespi.io] platform<br><b>2.</b> Login and select <b>Channels</b> panel<br><b>3.</b> Tap on a <b>channel</b><br><b>4.</b> When selected, a channel window appears. Click on <b>TOOLBOX</b></b><br><b>5.</b> When <b>TOOLBOX</b></b> is opened, a new screen appears, where records from the device sent to the channel can be seen<br><b>6.</b> Click on icon, which is at the bottom right side as shown in the picture below<br> | + | <b>1.</b> Go to [https://flespi.io/ flespi.io] platform<br> |
| − | + | <b>2.</b> Login and select <b>Channels</b> panel<br> | |
| − | + | <b>3.</b> Tap on a <b>channel</b><br> | |
| + | <b>4.</b> When selected, a channel window appears. Click on <b>TOOLBOX</b></b><br> | ||
| + | <b>5.</b> When <b>TOOLBOX</b></b> is opened, a new screen appears, where records from the device sent to the channel can be seen<br> | ||
| + | <b>6.</b> Click on icon, which is at the bottom right side as shown in the picture below<br> | ||
| + | [[Image:Server_icons.png|1000px|frame|center]]<br> | ||
| − | <b>7.</b> In the search field, search for <b>ble.beacons</b> parameter<br><b>Click on the eye button to add a column</b><br> | + | <b>7.</b> In the search field, search for <b>ble.beacons</b> parameter<br> |
| − | + | <b>Click on the eye button to add a column</b><br> | |
| − | |||
| + | [[Image:BLE_BEACONS_FLESPI.png|1000px|frame|center]]<br> | ||
<b>8.</b> If everything is done correctly, at the bottom, a new recently added column is visible: <b>ble.beacons</b> | <b>8.</b> If everything is done correctly, at the bottom, a new recently added column is visible: <b>ble.beacons</b> | ||
| − | [[Image:Blebeacons_column.png|1000px|frame|center]] | + | [[Image:Blebeacons_column.png|1000px|frame|center]]<br> |
| − | |||
<b>9.</b> Beacon data is sent to flespi platform, where beacon UUID can be seen and its radio signal strength | <b>9.</b> Beacon data is sent to flespi platform, where beacon UUID can be seen and its radio signal strength | ||
| − | [[Image:Ble_beacon_packet.png|1000px|frame|center]] | + | [[Image:Ble_beacon_packet.png|1000px|frame|center]]<br> |
| − | [[Category: | + | [[Category: Fleet Management platforms]] |
Revision as of 08:18, 21 April 2023
Main Page > General Information > Fleet Management platforms > Flespi with Fleet Management (FM) > First time with flespi platformIntroduction
Many clients who own a Teltonika device ask how to create a server to send data to. To get you a quick start, we present you a tutorial with the most important steps that have to be taken, when setting up your device to send data to the server – flespi platform!
First time with flespi
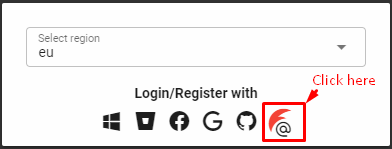
1. Go to flespi.io
2. Click on Login/Register button
3. Click on one of the icons to register with
In the example, registering is done as shown in the picture:
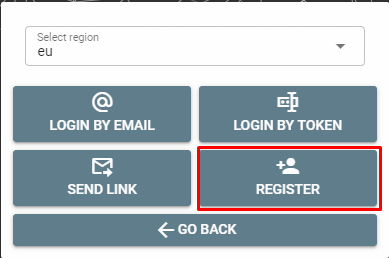
4. After clicking the ‘@’ icon, click the REGISTER button
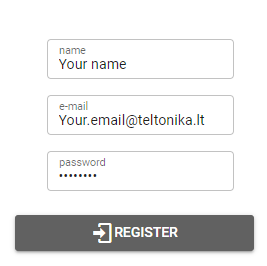
5. Fill the required fields in order to register
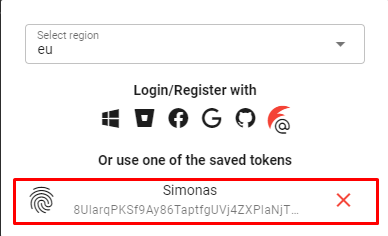
NOTE: When logging in the first time, a platform generates a MASTER FLESPI TOKEN, therefore you
will not be required to use a password, when logging into the platform next time. To login next
time, simply to press the fingerprint icon, visual example is shown below
How to add a device
1. Click on Telematics Hub to expand the panel
2. Click Devices tab
3. To add a device, click '+' button, which is at the bottom right corner of the screen
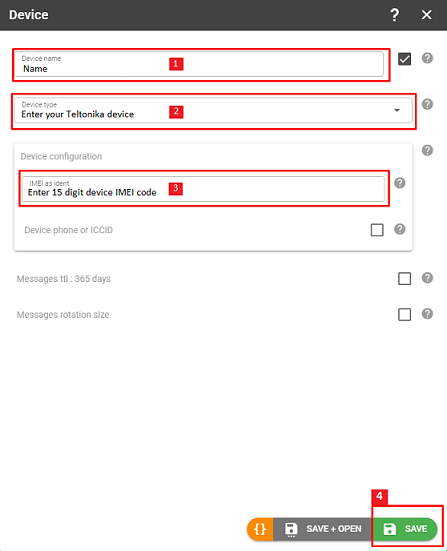
4. After '+' clicking button, a Device tab appears in which you have to fill the fields
5. Once saved, a created device in device tab appears
How to create a channel
1. Click on Telematics Hub to expand the panel
2. Click Channels tab
3. To add a channel, click '+' button, which is at the bottom right corner of the screen
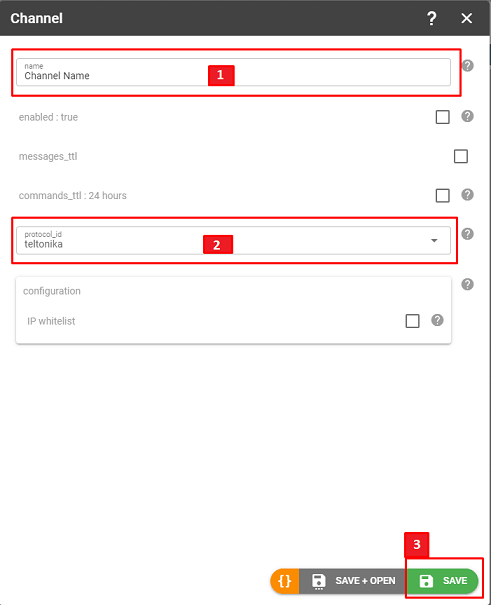
4. After '+' clicking button, a Channel tab appears in which you have to fill the following fields
5. Once the saving is done, a channel is created. In example below, a channel named TELTONIKA_TEST is created
How to connect a device to created channel
In instructions 'How to create a channel' a channel has been created with channel IP Address/Domain and Port numbers. To connect to that
channel, the device must be configured. IP Address/Domain and Port numbers are shown in image below.
Teltonika configurator: Setting up a device for communication with the server
|
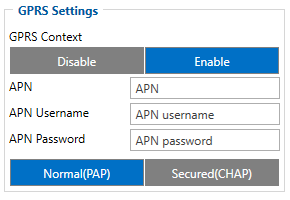
1. Press GPRS tab
More information about GPRS panel and it's parameters for each device can be found here: |
|
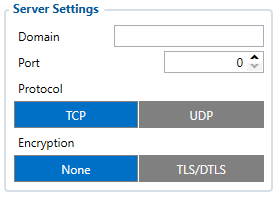
2. In GPRS->Server settings -> Domain field, enter flespi domain |
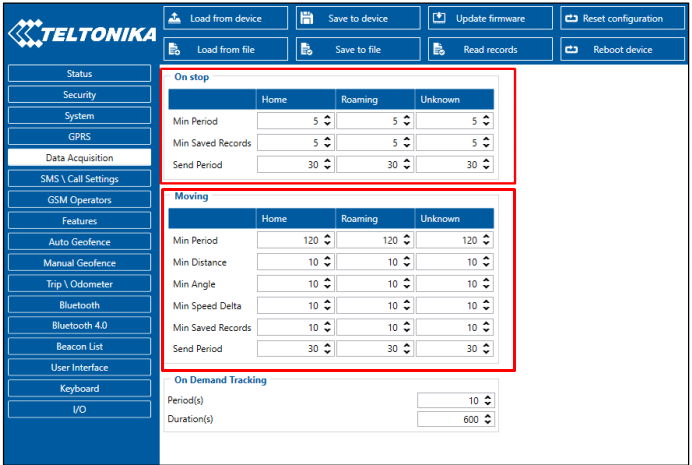
Note: To configure how frequently the device sends data to the flespi platform, go to Data Acquisition settings
and set On stop, Moving parameters in the configurator. In the example below, the device has been
configured to:
- Min Period – Acquire a new record every 5 seconds
- Min Saved Records – Have minimum 5 records in one data packet that can be sent to the server
- Send Period – Send records to the server every 30 seconds.
More information about Data acquisition panel for each device can be found here:
TST100 | TFT100 | GH5200 | TMT250
Tracking proximity records on flespi
Before going any further, make sure you have configured proximity settings!
- To find out more about proximity feature visit: About proximity
- To start a Proximity Quick Start Guide visit: Proximity functionality Quick Start Guide
1. Go to flespi.io platform
2. Login and select Channels panel
3. Tap on a channel
4. When selected, a channel window appears. Click on TOOLBOX
5. When TOOLBOX is opened, a new screen appears, where records from the device sent to the channel can be seen
6. Click on icon, which is at the bottom right side as shown in the picture below
7. In the search field, search for these parameters:
- proximity.duration
- proximity.violation.ident
- custom.param.889
Click on the eye button to add each of the searched columns
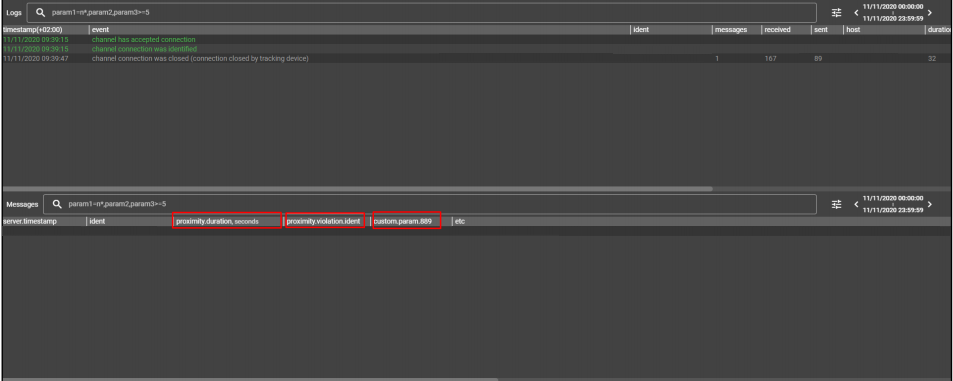
8. If everything is done correctly, at the bottom, three new recently added columns are visible
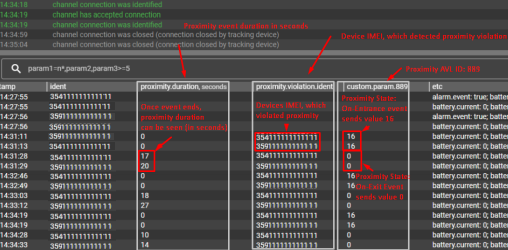
9. Now unplug the devices and test proximity feature. When proximity event happens, the device sends data to the flespi platform.
| Column name | Description |
| proximity.duration | Time period proximity event has happened in seconds |
| proximity.violation.ident | IMEI number of devices that have violated the personal space. |
| custom.param.889 | AVL ID – 889 Shows proximity state: On-Entrace event sends value – 16, On-Exit event sends value – 0 |
Tracking ManDown records on flespi
- To find out about ManDown feature visit: GH5200 | TMT250
- To learn how to configure a ManDown feature visit: ManDown scenario
1. Go to flespi.io platform
2. Login and select Channels panel
3. Tap on a channel
4. When selected, a channel window appears. Click on TOOLBOX
5. When TOOLBOX is opened, a new screen appears, where records from the device sent to the channel can be seen
6. Click on icon, which is at the bottom right side as shown in the picture below
7. In the search field, search for mandown.alarm.status parameter
Click on the eye button to add a column
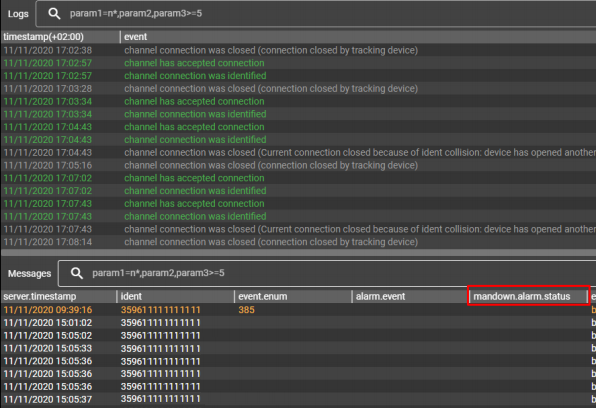
8. If everything is done correctly, at the bottom, a new recently added column is visible: mandown.alarm.status
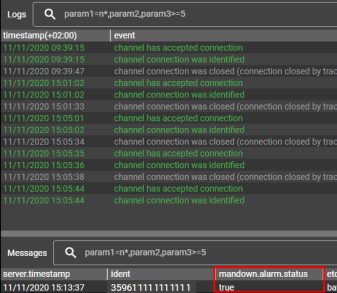
9. When a ManDown event happens, the device sends a record to flespi platform
In door tracking using BLE advertising Beacons on flespi
To learn how to configure in door tracking using BLE advertising Beacons visit: How to read data from BLE Beacons
1. Go to flespi.io platform
2. Login and select Channels panel
3. Tap on a channel
4. When selected, a channel window appears. Click on TOOLBOX
5. When TOOLBOX is opened, a new screen appears, where records from the device sent to the channel can be seen
6. Click on icon, which is at the bottom right side as shown in the picture below
7. In the search field, search for ble.beacons parameter
Click on the eye button to add a column
8. If everything is done correctly, at the bottom, a new recently added column is visible: ble.beacons
9. Beacon data is sent to flespi platform, where beacon UUID can be seen and its radio signal strength

